Tuesday, 11 May 2010

Katherine Petty from the Rare Tea Company

It looks like a brilliant design- I’m aware of the Galileo thermometer and how it works and it seems like a great way to get the optimum temperature for the water. As I’m sure you are aware, the temperature of the water is crucial to the final taste of the tea, and different teas need different brewing temperatures to achieve the best possible taste. This is something that is quite difficult to achieve using a kettle, so the use of a Galileo thermometer seems like an ideal solution. I also think the use of glass is good - I always use glass teapots as it’s the best way to see the colour of the tea and I can watch the leaves infuse perfectly. Instead of using the colour to determine whether it’s ready, I often go by time, steeping the tea leaves for anywhere between 1-5 minutes depending on what tea it is.

The only slight concern I have is that from that initially it does look rather complicated- a little like a science experiment rather than a tea serving set, but for experimental methods it must be the best way to find the temperature.

Well done on all your hard work and it’s great to have another tea fanatic among us! I apologise again that I couldn’t be much help, next time if you could let us know a little sooner before your deadline we should be able to dedicate more time to it.

All the best,

Katherine

Oscar from Suki Tea

I started SUKI TEA at a small Farmer’s Market with a good friend of mine in March 2005 in our quest for the perfect cuppa. With ethical sourcing our priority, we set out to provide consumers with the finest loose leaf tea, herbal infusions and fruit blends from around the world without compromising on quality and freshness. With multiple awards now under our belt, we are confident we have succeeded in our quest. SUKI TEA really is ‘TEA AS IT SHOULD BE’, however it was not an easy journey. When Callum presented me with his design for ‘The perfect cup’ it took me back to our original problem of how to bring a bit of mystique back into the tea drinking experience. Callum’s approach to this is from the tea drinkers perspective and I believe that an essential part of savouring something or the fine dining experience is to bring theatre to food and drink so I can see application for ‘the perfect cup’ in this area. The three glass system, temperature bulb, caddy and filter certainly turn making a brew into an artform. This concept is not about convenience rather the experience of tea, how it should be enjoyed. I look forward to see how Callum develops as a designer and will be keeping a close eye on his future work.

I have been researching teaware worldwide, consistently for the last 6 years and have not come across a more unique approach to serving tea. I’ll certainly be ordering ‘the perfect cuppa’ for myself if the opportunity arises.

Oscar Woolley

Co-Founder - SUKI TEA.

Local tea shop user testing


Completed object together


The tea board and metal together

Finished Tea board.

Building the tea board

The plastic for the tea board was layered together and cleaned up by putting a trim round the board using a mitre.
A hole was left in the board for a draw. The edges of the mitre were tidied using a little black wax to fill gaps.

Metal turning

The holes that were cut into the plastic are going to be filled with aluminum to help bring all the separate components of this product together.

Laser cutting layout on to plastic

Sunday, 9 May 2010

Plastic delivered

I went for the plastic made from old coffee cups by smile Plastics.

Recycled Plastics

Found a company called Smile Plastics which sell sheet recycled plastics. What is interesting about the company is a plastic they sell called Charcoal. This material is made from old coffee cups.
What a nice material for my tea board!

Costing

Spoken to a company who are happy to supply me with either Durat or Corian. Durat costs over £800 and Corain only £200. With Durat being out of my price range I am a bit unsettled at the thought of using a non recycled material as I can afford it. Think I should really focus on looking for an alternative.

Durat

Received a few samples of Durat.


Tea board

I am choosing between two materials Durat and Corian. Durat is a material used in hospitals and laborites for its durable and resistant properties and is made from recycled plastics. Corian has the same applications and properties as the Durat but is not as friendly to the earth. Is Corian a material I want to use? It doesn't tie in with the believes of drinking real loose tea which is sustainability.

I will look in to both and see which material is nicer.

Tea Filter Problem


The current tea filter design has a few problems. Visually it is heavy and due to the volume that the tea filter took within the carafe the water level had to be lower meaning the bulbs were had to retrieve. Along side those problems small tea leaves leaked out of the filter rendering it useless.The revisal of the tea filter is a mesh design visually lighter and takes less volume in the carafe leaving lower water level for easy bulb removal. The small holes in the mesh means there were little to no tea leafs escaping from the filter.

Tea Filter Problem

Balancing the weights

Using the old weights I was able to calculate what weight was required to balance the new weights. So the new weights were cut down and balanced so the bulbs responded to the correct temperatures.


Making the new weights.

With a visit from guest lecturer Stefano Milano he told me I should re think the design of my bulb weights. The old design of the leafs were nice but did not en-capture the theme of the product correctly. The tall glass carafe the scientific method of measuring temperature gives a very science feel, the leafs did not.


A revised design is a simple metal rod that can be hung on the bottom of the bulbs rounding off the scientific design.

Glass Return

The revised glass bulb with more volume and better loop for weight attachments.
The glass carafe return. A cup with vacuum double wall to prevent heat loss. Double walled carafe so it can be handled happily without burning.

Friday, 9 April 2010

Pieces returned from engineering


The tea caddy returned from engineering with the bevel for measuring tea.
Tea filter from engineering.

Thursday, 1 April 2010

Friday, 26 March 2010

Engineering

With decisions having been made about my tea strainer and caddy I had to send the two pieces off to be made.

Tea Caddy

With the most of my tea product taking the form of a cylinder it was only natural that my tea caddy take the same form. So my tea caddy will be a little aluminum holder. The innovation about this caddy is that the lid of the caddy will have a bevel in it. This bevel will be the measuring device for how much tea you put in to be brewed. The general rule of thumb is a teaspoon per cup per person. Meaning the bevel will have to be the size of a teaspoon.
Drawings to follow when I go near a scanner.

Tea strainer

From my sketches I modeled one of my tea strainer designs. A cone to sit inside my cylinder. This came with a few obvious problems, the tea would not have space to brew, it sat awkwardly in the vessel and on the board and while sitting on the board after brewing it would make quite a mess.
So I looked in to another design from my sketch book. A cylinder to go inside my water vessel. This design would stand on the board and with the holes not reaching the bottom of the filter this should minimize mess.
Drawings to follow when I get a chance to scan my sketch book.

Waiting on glass

With my idea finalised and the drawings sent off to scott glass its now the waiting game for it to return. So with that out the way I can focus on how tea will be brewed, stored and what the tea board will look like.

Friday, 19 March 2010

Simple

After phoning Scott Glass and chatting my idea over it turns out they just cant work to the specifications I require to make my design work. So back to the drawing board.
Why does it have to be so complicated in shape? So I decided its time to go back to basics. Just a straight basic cylinder and to protect users from the heat a double wall will be implemented. Modeled in engineering foam to give me an idea of general shape and size and what is comfy to hold.

Galileo Thermometer

For the critique I did not have a lot of time to think about the weights on the end of Galileo thermometer bulbs so I used washers. With more time to think about what hangs on the end of my bulbs my thoughts were drawn back to adding metaphors to my project and I decided to have leaf shaped weights.
To make these weights I would need to cast them so to begin I cut a variety of leaf sizes out of plastic. Next I obtained a cuttlefish bone (available at any good pet store) and sanded it back to expose a soft inner. My plastic leafs were pushed in to the cuttle fish and a tree was created (the yellow channel). This allowed for the metal to flow to each leaf.
The red channel is cut wide to create a funnel to make pouring the metal easier. The cuttle fish is then clamped against mdf create a seal around the mould.
The mdf is removed and the mould is revealed.
Finally the leafs were hung on my Galileo bulbs and worked very well.

Wednesday, 17 March 2010

Carafe

Exploration with the glass carafe took through lots of shapes.
I started with the design of my carafe with hopes of adding metaphors in to my product to give it more meaning. So I started playing with leaf shaped cups. So I knocked up a quick blue foam cup to see how it would feel to hold and drink from. After having several people hold and try the foam cup it went down well. The leaf cup will join on to a cylinder water vessel.
I used more blue foam to quickly play with how the cup will join together and have the idea clear in my mind before speaking to scott glass to see about having the glass made.

Tuesday, 9 March 2010

catch up

Been a few weeks since a last posted, so time for a quick update.

Last post you saw a 3D render of the planned model but after my critique with the lecturers it became apparent that I was taking on to much and the I need to reduce my work load to produce a good product. My Galileo Thermometer went down the best and thus I was encouraged to follow that idea through.
So now with one aspect of my project being pushed this raised a whole new pile of questions.
How does that reflect my model?
What would best portray the Galileo Thermometer idea?
Which material would best suit?

So with new problems facing me I started again. I instantly decided glass would be the best material. You can observer the tea brewing, you can follow Galileo thermometer and the glass complimented the Galileo thermometer nicely.
The next problem would be how the product will look and what the object will do. The general thought that came was the product should be long to so you get the full effect of the Galileo thermometer. Running over my old mood boards and surfing the internet lead me to a few tea objects made in bauhaus which then pushed me towards glass carafes. A water vessel and cup combination.
Moving forward with the glass carafe idea and Galileo thermometer I will need to work out a shape and a method now of brewing tea within it.

Wednesday, 17 February 2010

Play Critique

The time has come to present my current findings to my lectures. The two areas that have always been important to me is water temperature and brew time. I will show my Galileo thermometer working and how you judge brew time from the colour of the tea (this came from user testing). After displaying how to make the tea I am going to justify the choices to the materials I have chosen for my cups.
So basically I am presenting the tea set all the cups and my temperature method. Below is a 3D model displaying the materials and giving an idea of the aesthetics.


Monday, 15 February 2010

Galileo Thermometer

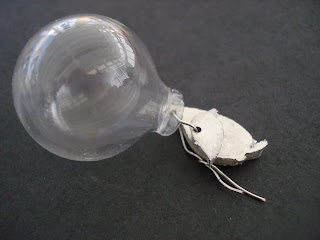
After the testing of my galileo thermometer and nothing going wrong with the bulbs being boiled, I went ahead and ordered bulbs to be made by Scott Glass. These are the bulbs I got back.

PICTURE

The bulb has washers hanging from it giving it a total weight of 12.4 grams with a diameter of 30 mm and wall thickness of 0.3mm (these are rough sizes)
With these sizes and weight the bulb would sink and boiling and float a around 84 C

Sunday, 7 February 2010

Cast Iron

For one of the cups I will be using cast iron. So I spent a lot of time trying to find a place that casts with iron. I tried powder hall in edinburgh first. Powder hall mainly casts in bronze, they do use other metals but iron is not one of them. The next company I tried was Ballantine Boness, this company specialises in cast iron perfect for my cup. After contacting the company they informed me that to make the cup it will cost me £800.... a bit out of my price range.

Plan B for the cup was to source Iron myself and have the cup lathed as much as possible to my design and have the cup finished by a cnc lathe.

So more to come on the progress of this cup.

Dead Ends

As my time runs out and my electronic skills do not seem to be growing I have been forced to look towards other alternatives of telling your tea is ready.
I have mentioned before that a tea company Suki tea gave me there tea bible and inside it tells the reader how to judge your tea is ready by the colour it produces. This method was also mentioned to me by my tea tasters, we should be keeping an eye out for the water changing colour.
To do this with a glass cup would be easy as you can see the tea clearly and easily. From my pictures I posted up about my form you can see a few cups have a white interior and this white interior will show the colour of the tea a lot better.

For time the user will judge the tea and its colour to tell when the tea is ready instead of using a timer.

Cup Testing

After previously testing my cups and choosing a form the heat retention was between 2:52 and 2:45 but to up that heat time I found an old tea preparation method known as Gong Fu which can be seen here.

http://jingtea.com/teaware/tea-sets/glass-gong-fu-set

The idea of this method is too pour boiling water in to all your cups to heat them. While the hot water in your kettle cools the cup heats. When the kettle water reaches the temperature required the water heating the cup is poured away and water from the kettle is used to fill the cup again with the tea for brewing.

This method increased the cup heat time up to .....

Porcelain cups

After playing with my form using engineering foam on the lathe I was able to take one of my models and use it to make a mould for producing porcelain cups. Below are pictures following roughly the stages of the process.

First thing to do for producing a mould is to have a sheet of set plaster to section off the top and bottom halves of the model. The to halves will be separately casted to complete the mould. The sheet of plaster was held up by clay and the plaster was boxed in and sealed using clay so the the liquid plaster does not run out.


The top of the model was cast in plaster first and left to set for 15 min. The same process was copied for the bottom half of the model to produce a complete mould.
The mould takes four days to dry out then will be ready to have porcelain poured in.

Heat Solution

Identified earlier when testing my clay cups there was a problem with picking up the hot cups without handles.

Tuesday, 2 February 2010

The beginnings of the prototyping

For the prototype of my model I have been using engineering foam to explore the form and give a visual of my product.These are some images of me using the lathe and below are images of the results. I have explored different shapes and an alternative to the handle for stopping the hands from being burned whilst touching the cups. More images will follow and with the cups finished better.


Tea Tasting

As a back up to my knowledge on tea taste being affected by water temperature and brew time, I held a tasting session to see what other people thought.

Green Dragon well tea brewing. Good tea leaves should hang in the water vertically as they brew shown here (knowledge I picked up from some tasters that came to the session)

The session consisted of three teas being tasted gunpowder deluxe green tea, dragon well green tea and jade sword green tea. Each tea was made perfectly and then ruined by the tea being over brewed with the water being too hot or under brewed with the water being to cold. The first two teas were down with the tasters knowing which tea was perfect and which was ruined. The final tea was done with out the tasters knowing which tea was perfect and which was ruined..... and the tasters guessed correctly. They could distinguish between the good and bad teas so water and time clearly affects the tea.

Galileo Thermometer Update - testing

With Scott Glass suggesting that my glass bulbs would explode I decided to test the method before I continued. So I bought a Galileo thermometer smashed it open and boiled the bulbs, repeatedly and NONE EXPLODED!! so everything is now back on track.

Monday, 1 February 2010

Cup Testing

To help more with form the cups were tested for how well they retained heat. Each cup had boiling water poured in to it and timed to see how long it took for the temperature to fall below 69C.
The first cups tested have the smallest openings and times for the looked like this
Thickest 4:00 min
Medium 3:43 min (averages)
Thinest 3:32 min

The second cups to be tested were the ones with the second biggest openings on top and there times are as followed
Thickest 2:52 min
Medium 2:50 min (averages)
Thinest 2:45 min

The final cups being tested had the biggest openings on top and the times are as follows
Thickest 2:00 min
Medium 1:58 min (averages)
Thinest 1:55 min

For ease with drinking and heat retention I will be using the second form for my final prototype.

One thing high lighted from this testing was that the cups with out handles were unbearable to hold from the heat. This will need to be sorted as I prefer cups without handles. Shown below is a cup with a handle and another without.
Without does look better.